The LetsLapse Case
Ideally, a case would just exist… And if it does, please let me know! Given that, building a case is required and for the first prototypes, a homemade job from PVC plumbing pipes has served very well. That said, it’s not very professional.
There’s no doubt that a case is required to house the Raspberry Pi Zero W, HQ Camera Module, and C-Mount Lens – which will be referred to as the LetsLapse Camera. The case pictures below are an evolution in simplicity to keep the LetsLapse Camera safe in outdoor conditions for a number of days while allowing semi-flexible usability.
Original prototype cases were too large and difficult to mount on simple tripod equipment, frustrating to access ports, and generally very clunky. So with that said, the ‘Pipe Case’ is ready for retirement and the next version to take its place.
Here’s what it needs to hold:
The Key Case-Feature Wish-List
Features that require interaction should be easy to perform (i.e. not require a complete dismantle, unless the assembly is very simple), and be combined with:
Weather protection for the Pi Zero, HQ Camera Module, and Lens
Pipe Case has not failed on this yet, however, it’s far from elegant.
Does not need to be waterproof, as in full-water-submission, but should withstand a serious storm for hours.
1/4″ female thread for standard tripod mounting
The HQ Camera Module has a 1/4″ female mounting point to fit standard camera tripods. This can be a) utilized directly, as the main mounting point to an external tripod, b) indirectly as a mounting point for an additional tripod mounting point (as with the Pipe Case), or c) as a means to secure the HQ Camera to the case.
In scenario c, an additional and secure 1/4″ 1/4″ female thread will be required and maintain a reasonable center of gravity with the overall case and interior components.
Components should be secure in-case
The portability of LetsLapse is critical and simple movement (e.g. to/from camera bags) should not allow for internal components to move around.
Where possible, screw holes of Pi or HQ Camera should be used to avoid additional processes in production.
Power delivery to LetsLapse Camera
The assumption is power will be supplied from an external device over USB. UPS batteries could be an option in the future, however simple, external USB power will suffice for compact size.
Pipe Case does this, but using no gaffer tape would be excellent.
Suitable lens proximity to the front of case/housing
C / CS mount lenses come in a variety of lengths – a longer ‘tele’ lens (e.g. 16mm) will require extra space to ensure weather protection.
A wide lens (e.g. 6mm) will need to be close to the front of the case; placing a wide lens too far back will result in image capture at the edges of the shot.
Ideally, the HQ Camera mounting point could slide or have designated positions for ‘tele’ / ‘standard’ or ‘wide’. Building a flexible case to meet feature this does introduce complexity, so a potential solution could be a ‘wide case’, ‘tele case’, with some variance in the HQ Camera Mounting.
The solution for the Pipe Case was multiple 1″4-inch mounting holes, which get sealed up when not in use. This allows for a wide 6mm or standard 10mm lens.
OTG USB access
Allows for direct file access direct from the device which is much faster than WiFi.
Port is right next to the power supply port, so the same ‘door’ could be used.
Pipe Case does this, but using no gaffer tape would be excellent.
MicroSD card access
At the end of a shoot, the fastest method of transferring files is via the Micro SD card which requires easy removal.
Pipe Case requires removal of the front lens hood + UV filter, and less use of gaffer tape is preferred.
The potential evolution of the Pipe Case would be to swap directions of the Pi Zero and give rear access to the MicroSD card.
Focusing and changing lenses
Pipe Case allows for focusing while plugged-in, using needle-nose plyers. Focusing, while plugged in, is essential as we need to review the focus of the image while making changes.
Not a super-common task; once focused, the lens should maintain focus unless knocked.
Placing the lens inside the Pipe Case does increase the risk of accidental miss focusing the lens.
Pi + HQ Camera Specifications
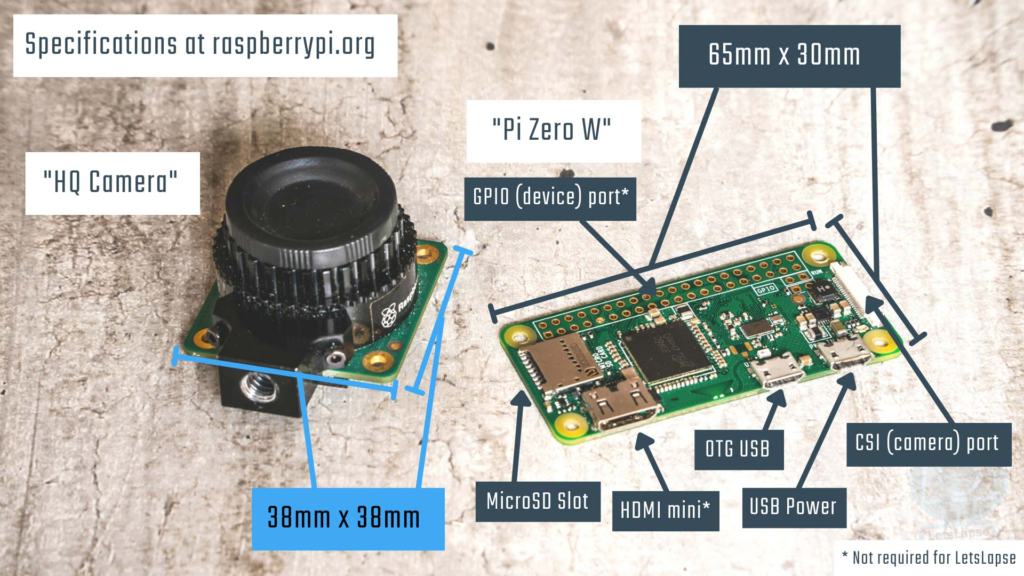
Links to raspberrypi.org
Full specifications and machanical drawings for the Pi Zero W (link – look for ‘Pi Zero W Board’) and HQ Camera Module (link – look for ‘hq-camera-mechanical-drawing.pdf’) are available from raspberrypi.org.
Look for ‘Pi Zero W Board’
Pipe Case – Current Design
As of July 2021, a homemade solution has been working with resonable success, but requires some effort to produce. The “Pipe Case” consists of:

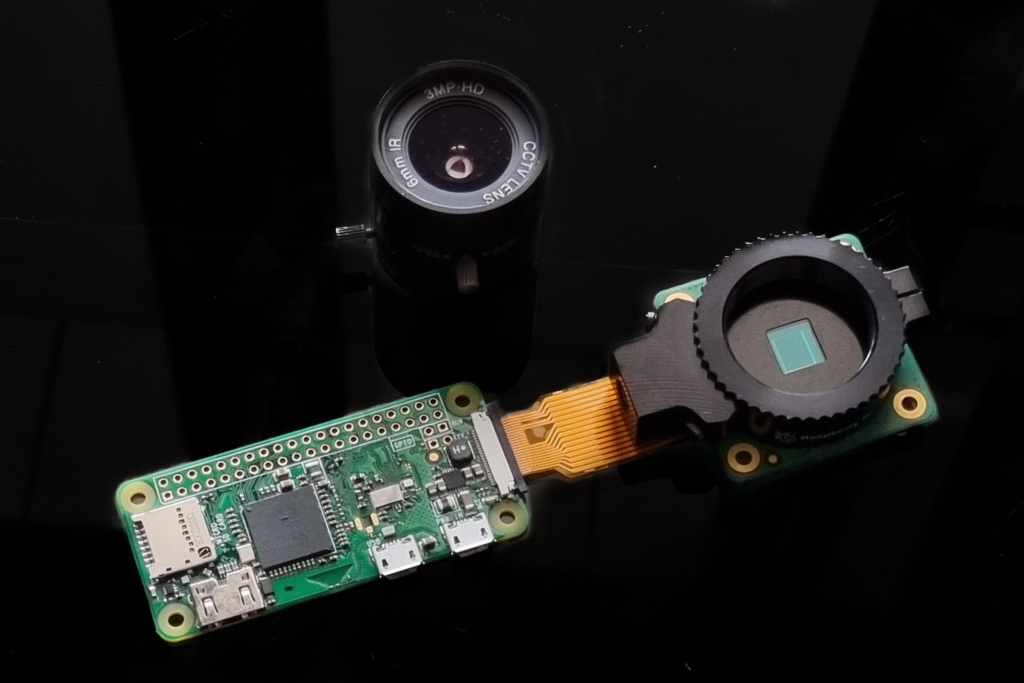
Starting off, it’s naked and won’t survive without some protection. The Pi Zero connects to the HQ Camera module, which in turn connects to a C-Mount (or CS-mount) lens. These lenses are relatively inexpensive and commonly used in security cameras.
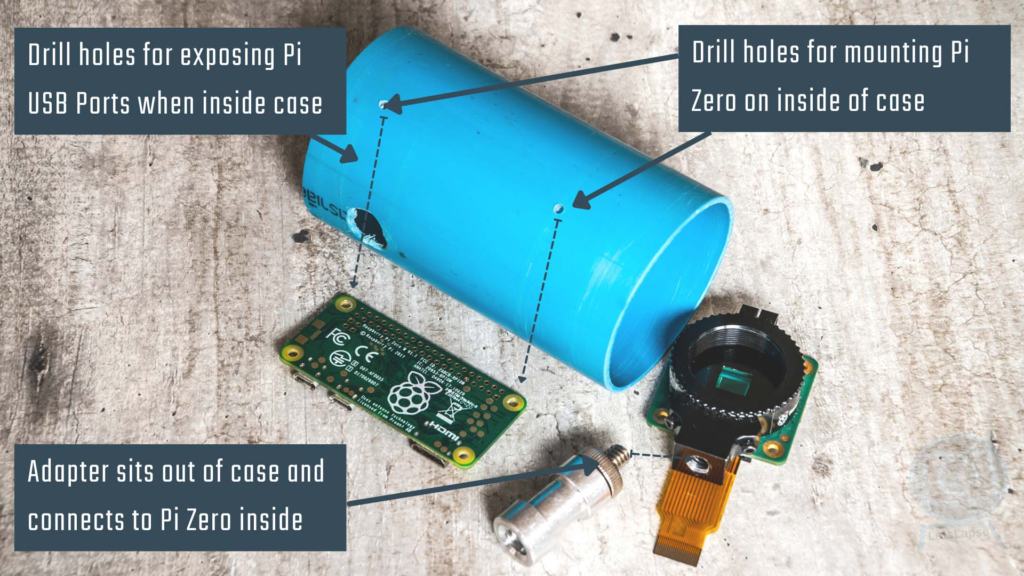
Drilled holes allow for mounting of the Pi Zero and HQ Camera Module to keep secure. The case itself is very inexpensive and can be made from parts in any hardware store with plumbing parts.
Another cheap part that can be purchased at any plumbing store, this component provides very good protection from the weather, while being very easy to remove when access is required.
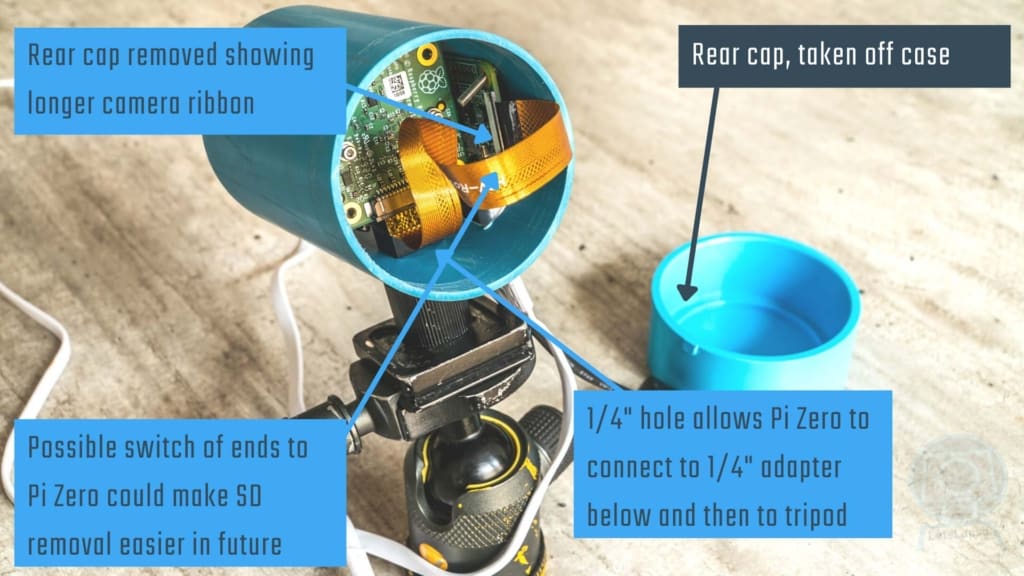
Current prototypes have the SD card slot of the Pi Zero at the front of the camera, but future versions of this design should reverse the position to make it accessible from the rear.

Provides front-facing weather protection, keeping internals dry. Also, doesn’t connect with Pi with any elegance, but gaffer tape does the job. Unfortunately, way too much reliance on gaffer tape is needed for this design.

While the internals of the case is essentially a turbo-charged security-web-cam and computer, the case itself needs to be small and fit to traditional camera tripods.